Create a Bootable USB Flash Drive using Poweriso
Why Do You Format USB Flash Drive
- The storage devices that are widely used nowadays are typically HDDs and SSDs, which are always set up on a PC/Mac to install the operating system and store data files.
- Meanwhile, there are many other types of prevailing devices with more flexible features for different purposes. Yes, they are removable storage devices such as USB flash drive.
- The truth is that no matter what drive you're using, it must have a valid file system so that Windows can recognize it and put it to use.
- What's more, it's inevitable to develop bad sectors or corruption issues on a specified flash drive after a long-time use.
- By formatting, you can easily fix any USB flash drive, pen drive or memory stick that is write protected, virus infected, corrupted, damaged, unreadable, unrecognized by PC and Mobile.
- So here comes the question, how to format a USB flash drive? This page mainly illustrates how to format a USB flash drive using Windows inbuilt Command Prompt, and the following is the detailed guide you should strictly follow.
Create a Bootable USB Flash Drive
- For your information, any form of PowerISO formatting will completely erase data, so backup as many as important files before the start.
- Altogether, you'll walk through the whole formatting process in eight steps, and the time spent will depend on the USB flash drive capacity and used space on it. (The following steps are performed on Windows 10 PC.)
Step 1: Start PowerISO
Step 2:Insert the USB drive you intend to boot from.
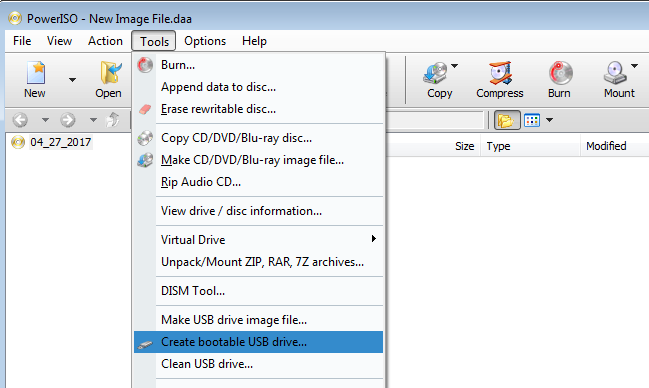
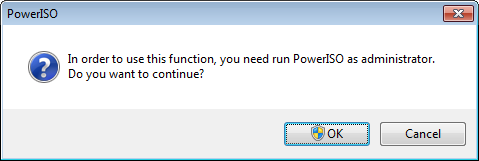
Step 3:Choose the menu "Tools > Create Bootable USB Drive". The "Create Bootable USB Drive" dialog will popup. If you are using Windows Vista or above operating system, you need confirm the UAC dialog to continue.
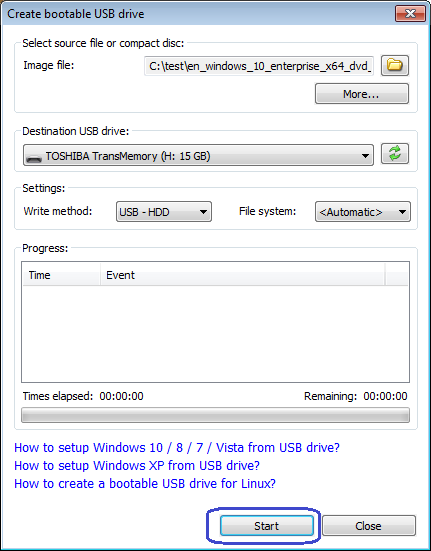
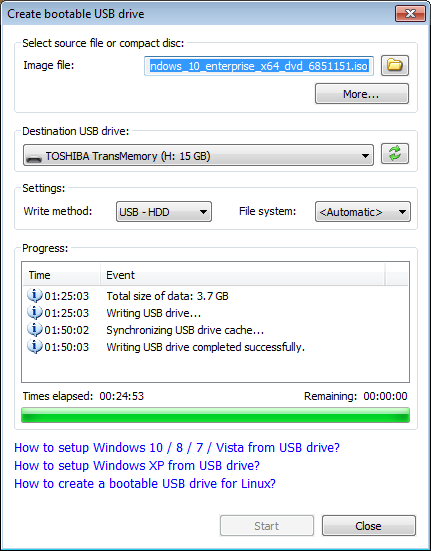
Step 4: In "Create Bootable USB Drive" dialog, click "..." button to open the iso file of Windows operating system.
Step 5: Select the correct USB drive from the "Destination USB Drive" list if multiple USB drives are connected to the computer.
Step 6: Choose the proper writing method. "USB-HDD" is recommended.
Step 7: Click "Start" button to start creating bootable USB drive.
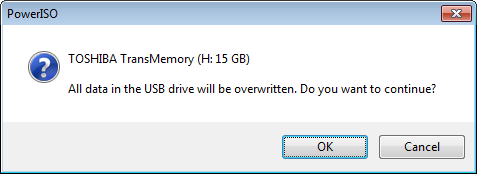
Step 8: PowerISO will alert you that all data on USB drive will be destroyed. Click "OK" to continue.
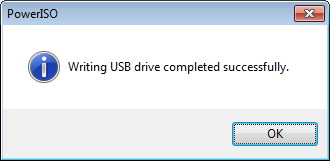
The program will start writing USB drive, and showing the progress information. You should get the message "Writing USB drive completed successfully." after the operation completes.
If no errors occurred in the above process, you should now be all set to setup Windows from USB drive!
You may also like: